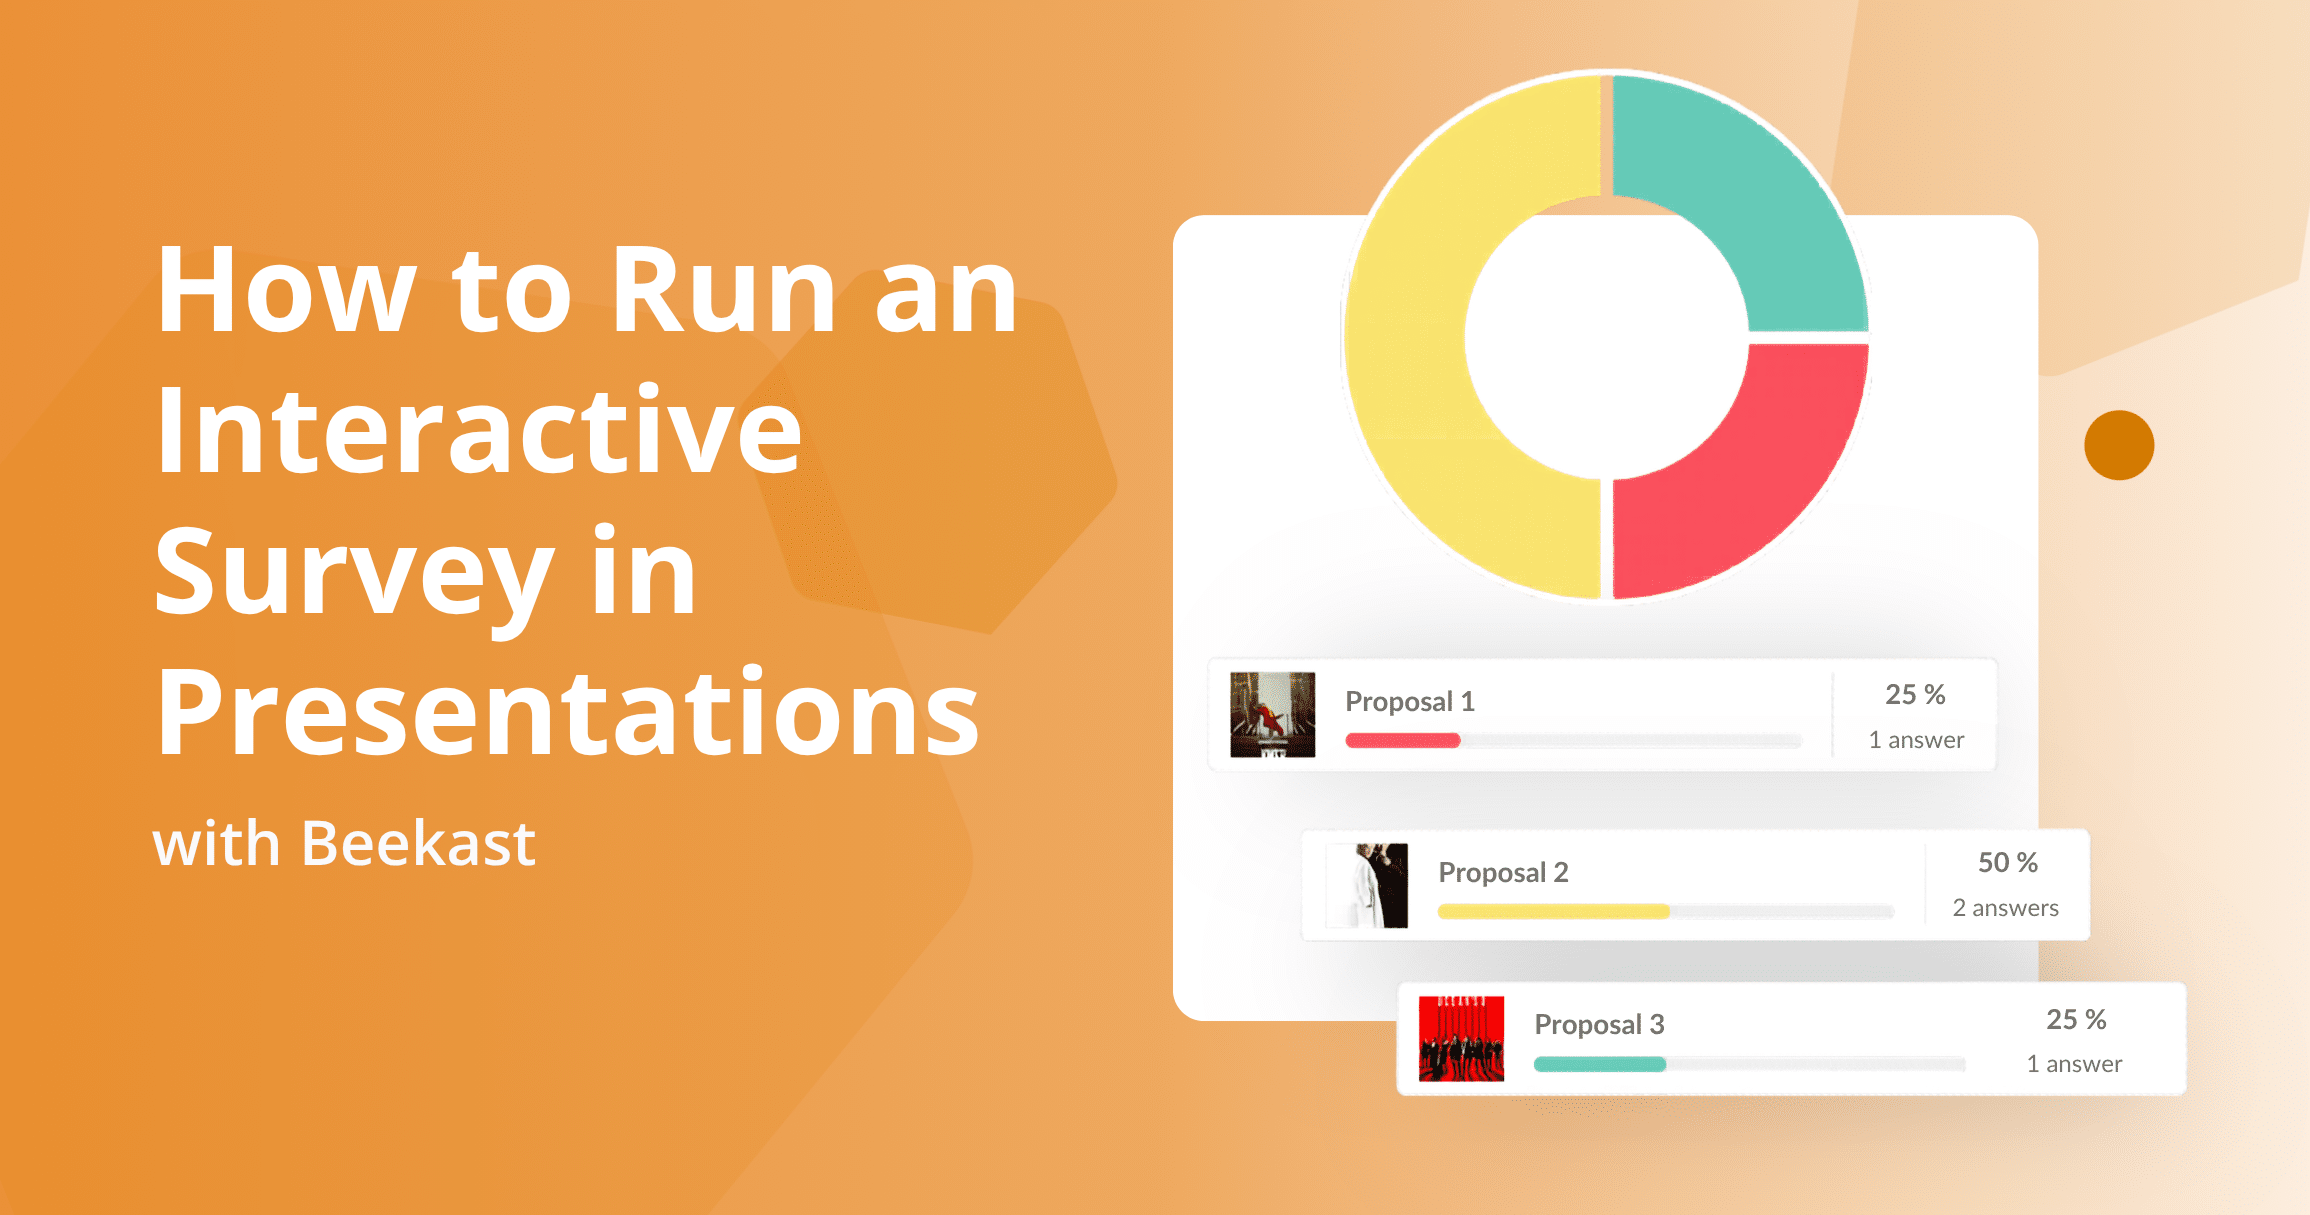
A whiteboard activity gives every participant a shared visual space to draw, write, and contribute — right inside the meeting itself, without switching to a separate tool. Most collaborative whiteboard software sits entirely outside your meeting flow: you share a screen, paste a link, and half the group ends up confused about where to click. Beekast’s Whiteboard is different because it’s a native slide in your session, not an add-on you bolt on afterward.
Whether you’re running an icebreaker, a co-creation workshop, or a visual brainstorm, the Whiteboard activity lets participants draw, add sticky notes, insert images, and annotate a shared space in real time — all from their own devices, with no account required.
In this guide, you’ll learn what the Beekast Whiteboard activity is, why it works for meetings and workshops, five practical ways to use it, and how to set it up step by step.
What Is the Beekast Whiteboard Activity?
The Beekast Whiteboard is an interactive whiteboard slide built directly into a Beekast session. Instead of launching a separate whiteboard tool and asking participants to follow a link, you add a Whiteboard slide to your session flow — and it appears at the right moment, on every participant’s screen, exactly when you need it.
Participants can draw freehand, type text, add sticky notes, and insert images, all on the same shared Whiteboard in real time. The facilitator can also start from a ready-to-use template — such as the Blob Tree icebreaker — rather than a blank screen, making it much easier to give participants a clear task from the moment the Whiteboard opens.
For example, at the start of a team workshop, a facilitator could open a Blob Tree Whiteboard slide and ask everyone to mark where they are on the tree — a quick, visual way for each person to express how they’re feeling before the session begins.
Why Use Beekast’s Whiteboard in Meetings?
Beekast’s Whiteboard activity is built for live facilitation. Here’s what makes it effective:
- Supports freeform visual collaboration: participants can draw, write, annotate, and add images simultaneously — giving the session a creative, open-ended energy that structured activities alone can’t provide.
- Lives inside the session flow: the Whiteboard is a slide in your Beekast session, so it appears at the right moment automatically. There’s no need to share a separate link or switch applications mid-meeting.
- Includes ready-to-use templates: instead of starting from a blank Whiteboard, you can choose from pre-built templates like the Blob Tree, giving participants a clear structure to respond to from the moment the activity opens.
- Works for any level of visual confidence: participants don’t need to be designers or artists. Adding sticky notes, typing text, or placing a mark on a diagram is enough to participate meaningfully.
- Runs seamlessly for remote and hybrid teams: participants join via a simple session link or code from any device, and the Whiteboard integrates naturally with Zoom, Microsoft Teams, and Google Meet.
- Produces a shareable visual output: at the end of the activity, the Whiteboard is a ready-made artifact — a collective picture of the group’s thinking that can be exported and shared without any transcription.
How to Set Up the Whiteboard Activity in Beekast
Adding a Whiteboard activity to your Beekast session is easy.
- Log in to your Beekast account. If you don’t have one, you can sign up for free. Share your session link or code with participants so they can join on any device — no account needed.
- In your session workspace, click “Add a slide” in the top left. From the activity menu, select “Whiteboard.” A Whiteboard slide will be added to your session.
- Configure the Whiteboard. In the editing panel, choose a ready-to-use template (such as the Blob Tree for icebreakers, or a blank Whiteboard for open co-creation), add a title or prompt to guide participants, and adjust any collaboration settings.
- When you’re ready to launch, navigate to the Whiteboard slide and click “Start.” The Whiteboard appears on every participant’s screen simultaneously.
- Participants draw, write, add sticky notes, and insert images on the shared Whiteboard in real time. As a facilitator, you can see all contributions appear live and annotate or guide the activity as it unfolds.
- Close the Whiteboard when the activity is complete. The visual output is saved and can be displayed to the group, discussed, or exported as part of your session summary.
5 Ways to Use the Whiteboard Activity in Your Meetings
Here are five practical ways to use Beekast’s interactive whiteboard Whiteboard to make your meetings and workshops more engaging.
1. Run a Visual Icebreaker
The start of a meeting is when energy is lowest, and people are most guarded. A visual icebreaker using the Whiteboard changes this immediately. Instead of going round the room asking “how is everyone?”, you give participants something to interact with.
The Blob Tree is one of Beekast’s most popular Whiteboard templates for this purpose. It shows a tree with illustrated figures in various positions — climbing, sitting, falling, and standing at the top. Ask participants to mark or annotate where they see themselves on the tree.
Within two minutes, every person has contributed something visual, the group has a shared starting point, and the facilitator has real insight into how the room is feeling before the main work begins.
Why It Works
- Gets everyone contributing in the first two minutes
- Visual metaphors are lower-stakes than verbal check-ins for most people
- Sets a creative, open tone that carries into the rest of the session
Best for: team meetings, workshops, training sessions, onboarding sessions, and all-hands kickoffs.
2. Co-Create a Project Together
Some ideas can only take shape visually. When a team needs to sketch out a concept, map a process, or build a shared picture of what something should look like, a whiteboard Whiteboard is far more effective than a slide deck or a shared document.
Open the Whiteboard with a theme or brief — “sketch what our ideal onboarding experience looks like for a new customer” or “add your vision for where the product should be in 12 months.” Participants contribute in whatever format works for them: words, drawings, sticky notes, or images. The result is a genuinely collective artifact that reflects the whole group’s thinking, not a single person’s slide.
Why It Works
- Visual co-creation surfaces ideas that don’t emerge in verbal discussion
- Everyone contributes in their own format, which increases inclusion
- The Whiteboard becomes a shared reference point that the group can return to
Best for: product workshops, design sprints, strategy sessions, creative briefings.
3. Map Out Ideas Visually
When a group is working through a complex topic, visualizing the connections between ideas helps everyone think more clearly. A Whiteboard activity lets participants contribute to a shared mind map, concept diagram, or idea cluster in real time — without the facilitator having to write everything.
For example, during a planning session, a facilitator could open a Whiteboard with a central concept already placed and ask participants to add related ideas branching out from it. As contributions appear, the facilitator can draw connections, group clusters, and annotate the map in real time. The result is a collaboratively built overview of the topic that everyone has shaped.
Why It Works
- Visual structures help people see patterns and relationships they miss in lists
- Participants build the map together, increasing ownership of the output
- Works as a reference document immediately after the session
Best for: planning meetings, problem-solving workshops, training sessions, and project kickoffs.
4. Run an Energy or Mood Check
Understanding how a group is feeling — especially before a difficult topic or a long session — is one of the most underrated facilitation skills. A visual mood check in Whiteboard gives you that insight quickly, without putting anyone on the spot.
Use a template with a visual scale, landscape, or metaphor — a weather map, an energy dial, or a simple “where are you at” axis — and ask participants to mark or annotate their position. It takes under 2 minutes, and it tells you exactly how to calibrate the session’s energy before you begin.
Why It Works
- Anonymous or semi-anonymous contributions reduce social pressure
- Gives facilitators real data on group energy before the session starts
- Opens space for people to signal concerns without having to speak them aloud
Best for: team retrospectives, post-project reviews, and any session that follows a difficult period.
5. Run a Structured Visual Workshop Activity
Some of the most effective workshop formats are inherently visual — affinity mapping, customer journey mapping, the 4Ls retrospective, and the speedboat exercise. These activities traditionally require a physical wall, sticky notes, and markers. With Beekast’s Whiteboard, you can run the exact same activities with a remote or hybrid group.
Set up the Whiteboard with the relevant template or zones pre-drawn — columns for an affinity map, journey stages for a customer map, or sail and anchor for a sailboat retrospective — and let participants contribute directly. The facilitator guides the group through the activity live, just as they would in person.
Why It Works
- Brings proven in-person workshop formats into remote and hybrid settings
- Participants interact with the Whiteboard directly rather than watching the facilitator fill it in
- The final Whiteboard is a complete, exportable workshop output with no additional work
Best for: retrospectives, user research workshops, agile ceremonies, training sessions, and team health checks.
Whiteboard Best Practices
Here are three principles that make a Whiteboard activity more effective in meetings and workshops
1. Always Give a Clear Prompt Before Opening the Whiteboard
A blank Whiteboard with no instructions creates hesitation. Participants don’t know what to add, how much space to use, or whether their contribution is “right.” The result is a slow, awkward start where everyone waits for someone else to go first.
Before you launch the Whiteboard, tell the group exactly what you want them to do: “Add a sticky note describing the biggest challenge in your current project,” or “Mark where you are on the Blob Tree.” A clear, specific prompt removes hesitation and gets contributions flowing immediately.
2. Use Templates to Reduce Blank-Whiteboard Anxiety
Even with a good prompt, a completely empty Whiteboard can feel overwhelming — especially for participants who don’t consider themselves visual thinkers. Starting from a template that already has structure — zones, labels, a central image, or a guiding framework — gives people a clear place to contribute without having to design the space themselves.
Beekast’s ready-to-use templates speed up session setup so you can focus on the facilitation. For icebreakers, the Blob Tree is a strong starting point. For retrospectives, a pre-zoned four-quadrant template keeps contributions organized from the start.
3. Set a Time Limit and Stick to It
Open-ended whiteboard activities can drift if participants feel there’s no endpoint. Setting a visible timer — typically two to five minutes for an icebreaker, five to ten for a co-creation activity — keeps energy focused and prevents the activity from taking over the meeting.
A time limit also encourages participants to go with their first instinct rather than overthink it, which usually produces richer, more honest contributions. When the timer ends, move directly into discussion or the next activity — the Whiteboard is already there as a shared reference point.
Bring Visual Collaboration into Every Meeting with Beekast
A whiteboard activity works best when it’s built into the meeting flow, not bolted on as an afterthought. Beekast’s Whiteboard gives you a collaborative visual space that appears exactly when you need it — as a native slide in your session, ready to use on any device, with no separate tool required.
Instead of static slides or one-sided discussions, you get live co-creation where every participant contributes visually, builds something together, and leaves with a shared artifact that reflects the whole group’s thinking.
If you want to run meetings and workshops where people genuinely collaborate visually, sign up for Beekast for free and try the Whiteboard activity in your next session.
Whiteboard Whiteboard Activity FAQs
Got more questions about using Beekast’s Whiteboard activity in your meetings? We’ve answered a few below.
1. What is the Beekast Whiteboard Activity?
The Beekast Whiteboard is an interactive whiteboard slide built into a Beekast session. Participants can draw freehand, add sticky notes, insert images, and type text on a shared visual Whiteboard in real time, directly from their own devices. Unlike standalone whiteboard tools, the Beekast Whiteboard is embedded in the session flow — it appears at the right moment without requiring participants to open a separate application or follow a different link.
2. Can Participants Draw and Write on the Whiteboard at the Same Time?
Yes. Multiple participants can contribute to the Whiteboard simultaneously in real time. Each person can draw, write, add sticky notes, or insert images at the same time as everyone else, and all contributions appear on the shared Whiteboard as they’re made. The facilitator can see all activity live and guide the session as it unfolds.
3. Does the Whiteboard Activity Work for Remote and Hybrid Teams?
Yes. Participants join from any device — laptop, tablet, or smartphone — using a session link or code, with no account required. The Beekast Whiteboard activity works seamlessly in fully remote sessions and hybrid setups alike, and integrates naturally with video conferencing tools, including Zoom, Microsoft Teams, and Google Meet.
4. What Templates are Available for the Whiteboard Activity?
Beekast offers a range of ready-to-use Whiteboard templates, including the Blob Tree for visual icebreakers and mood checks, as well as blank templates for open co-creation. Additional workshop templates — including retrospective formats, brainstorming frameworks, and visual mapping tools — are available in the Beekast template library. You can also start from a blank Whiteboard and build your own structure before launching the activity.
5. Can I Export the Whiteboard After the Session?
Yes. After the session, Beekast saves the Whiteboard as a visual output that can be exported and shared with participants. This makes it easy to include the Whiteboard in meeting notes, use it as a reference in follow-up discussions, or archive it as a record of the workshop without any additional work.